Mary Poppins Junior
Mary Poppins Junior
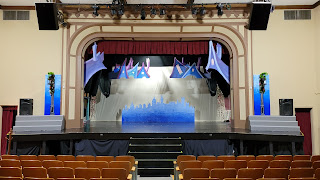
This is my second show with Town Hall Theater. I learned so much with my first show but even more with this show. I started with the design specs and as the pieces came to me I painted them. The rooftops and the city came first then the steps and then the furniture.
Here are the design plans that I had to work with. This is where I began figuring out how to attack this project! These pictures were taken after all the work was finished. Notice the paint splatters on them, they really got used!
The Beginning: Rooftops and Cityscape
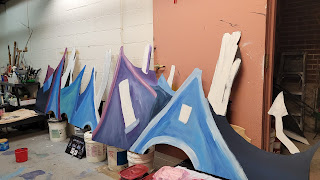
And so it began with these rooftops and the cityscape to paint. I painted them black first and then added white. I painted the cityschape grey first and then added a variety of blues. Did most of this in the first week. I was so happy to have the nice painting space to work in! Although I had to do the cityscape on the stage it was too big for my space.
Decided to paint everything black first.
Note to self paint the back of the piece before you begin! I didn't think of it until after I had painted the front. I had to turn them over on the stage to paint them. Only had to touch up a few places though!
The Lamp Posts.
These were not in the plans. They were add in. The lamps were to hang over the boards, so I thought it would be nice to have actual lamp posts under them.
Went out to the street in front of the theater to look at the lamps and used these as a starting point.
Here are the lamp posts
The lamps we used were a copper color and I painted them black. I was surprised that the latex paint worked on them!
Here are the finishing products. Pretty good if I don't say so myself. The flowers are from my stash at home.
The Boxes
These are the boxes for the stage. I had a hard time matching the color. I didn't buy grey, because we had several cans of grey on the shelf. Unfortunately most of it turned out to be a warm grey instead of the cool grey that was specified in the plans. I went through so many color changes on these boxes and painted them at least three or four times. Then I tried the spatter technique that was recommended on the plans, but it turned out to just look dirty. So I went back to just flat paint. I found the right combination of the warm grey and I mixed in some some blacks and whites too.
Here's my attempt at spatter technique...didn't work very well. Just looked sloppy.
The Fireplace
Here is where I started with the fire place, before I painted it.
Had a heck of a time covering the brick that was in the front! But finally got it after a coat of undercoat paint!
The final product.
The Bank Front
Remembered to paint the back first this time! It went pretty quickly.
Well these things will happen. They kept reattaching the lights and then finally just cut them off in the end.
The stairs. I had to paint the molding on them.

The Beds
These were one of the last things that I painted in the paint studio. It was my idea to add the bed skirts, but our props person completed them after I painted them.
The moving picture frame and paintings.
We had to have a painting over the fireplace that changed with the scenes. It had to be different in the living room and the kids bedroom. Our tech guy figured out how to make a turning painting over the fireplace. I had to paint the paintings. A different one on each side.
I decided to use pictures from the original Mary Poppins movie. For the living room the painting was a reproduction of Burt's chalk paint. The painting that
they jumped into in the movie. In the kids room I did a reproduction from a animated portion of the movie when they are riding the merry go round horses.
Here's what I started with. Each side of the frame was different.
I painted each of them white and started the paintings. I had to remember that the paintings had to be upside down to each other and on opposite sides.
I decided to use some images from the original Mary Poppins movie
The picture above from when they are in the chalk painting in the movie. The picture below was for the living room. It was a reproduction of Burt's chalk painting.

Here is the progression of the paintings. I didn't have very much time to work on the paintings. Just about one day. But they went pretty quick!
Here are the final paintings.
Furniture
I painted all of these things on the stage. I'm always nervous working on the stage. They are always telling me that we'll cover the paint that I get on the stage when we paint the stage, but I still don't like getting paint on the stage. I bought a small drop cloth this time to put under my paint stuff, which helped a little.
Almost a Disaster
I had a disaster about halfway through painting the things on the stage. I put my paint bucket on the top of the door as I was painting it. I thought that it was wider than it was. I bumped it. It went down on the stage and splattered out into the house. I panicked! I went immediately to get a bucket and water and started mopping up. Then Tom, the tech man, came in and started helping me. He got a mop and a bucket. We knew that we had to get it up quick. Surprisingly we got most of it up! It's fortunate that they are replacing everything in the theater after this show over the summer months. But if this would have happened next year, it would have been a lot worse. The bad thing is that everyone seems to know knows about my mishap! Hopefully this is my only mishap! I'm hoping that I can mostly paint in my paint room next year!
These are the finishing touches on the doors and the fireplace. The six panel doors were more difficult that I thought they would be! Made the fireplace look more realistic by adding last minute texture!
Dress Rehearsal
I decided to sit through the dress rehearsal this time. It was so exciting to see my set pieces in action!
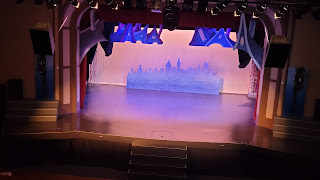
I didn't create the back drop in this picture it was from another production. But it fit perfectly!
We had a heck of a time with the floor. couldn't get the right color.
But finally after the second coat of a different black it looked great!

Here's the finished product and it looks great!
Always sad to see the set go. Kind of sad when all your hard work just stacked up at the door!
Well that's it for this year. I think I'll be doing some things not related to the theater over the summer. But looking forward to next year's shows!


.jpg)


Comments
Post a Comment